Thursday 25 September 2008

Hooking up Commands to Events in WPF

A question came up on the Stack Overflow website a little while back about how to execute a command when an event is raised. The questioner, Brad Leach, is using a Model-View-ViewModel architecture for WPF (of which I'm also a fan) and wanted to know how he could hook up a Command on his ViewModel to the TextChanged event of a TextBox in his View. In his case, it turned out that he got what he needed by Data-binding the Text property of the TextBox to a property on the ViewModel; in my answer to his question I outlined an approach that can be used in other cases where properties are not involved, so that the data-binding trick doesn't work. Now I've gone one better, and created a a utility class, EventBehaviourFactory, that makes it easy to hook up any WPF event to a Command using Data Binding.

Using EventBehaviourFactory you define new attached properties, one for each kind of event you want to hook a Command to. Then you set the value of the property on a WPF element, specifying the command that you want to be executed. When the event is raised, the command will be executed, with the EventArgs being passed through as the command parameter.

Using the EventBehaviourFactory

First of all, you need to include my EventBehaviourFactory class in your project. You can either copy the code from the bottom of this post, or get the whole project from MSDN Code Gallery.

Then you need to define a static class to hold a new Attached property that you will attach to an object to specify which command to execute when a particular event is raised. You need to call EventBehaviourFactory.CreateCommandExecutionEventBehaviour and pass it the routed event that you want to handle - note you must pass the static field holding the RoutedEvent object (usually the same name as the event itself, but ending in "Event") not the event property. Just as when creating a standard attached property, you also need to pass the name of the property as a string (this should match the name of the static field that you store the DependencyProperty in), and the type of the class that is defining the property.

As an example, I'll create a property that will execute a Command when the TextChanged event of a TextBox is raised:

using System.Windows;
using System.Windows.Controls;
using System.Windows.Input;

namespace FunctionalFun.Wpf
{
    public static class TextBoxBehaviour
    {
        public static readonly DependencyProperty TextChangedCommand = EventBehaviourFactory.CreateCommandExecutionEventBehaviour(TextBox.TextChangedEvent, "TextChangedCommand", typeof (TextBoxBehaviour));
        
        public static void SetTextChangedCommand(DependencyObject o, ICommand value)
        {
            o.SetValue(TextChangedCommand, value);
        }

        public static ICommand GetTextChangedCommand(DependencyObject o)
        {
            return o.GetValue(TextChangedCommand) as ICommand;
        }
    }
}

The important part is in line 9, where I'm calling EventBehaviourFactory. This is the part that creates the attached behaviour. In the download, I've included a Resharper template to mostly automate this step. To make use of the property you just set a value for it on the object whose events interest you, binding it to the appropriate command. Here's an example:

<Window x:Class="FunctionalFun.Wpf.Window1"
    xmlns="http://schemas.microsoft.com/winfx/2006/xaml/presentation"
    xmlns:x="http://schemas.microsoft.com/winfx/2006/xaml"
    xmlns:ff="clr-namespace:FunctionalFun.Wpf"
    Title="Window1" Height="300" Width="300">
    <Window.DataContext>
        <ff:ViewModel/>
    </Window.DataContext>
    <Grid>
        <Grid.RowDefinitions>
            <RowDefinition/>
        </Grid.RowDefinitions>
        <TextBox ff:TextBoxBehaviour.TextChangedCommand="{Binding TextChanged}"/>
    </Grid>
</Window>

The ViewModel that this Window uses (initialised in line 7) is:

using System;
using System.Collections.Generic;
using System.Linq;
using System.Text;
using System.Windows;
using System.Windows.Input;

namespace FunctionalFun.Wpf
{
    public class ViewModel
    {
        public ICommand TextChanged
        {
            get
            {
				//  this is very lazy: I should cache the command!
                return new TextChangedCommand();
            }
        }

        private class TextChangedCommand : ICommand
        {
            public event EventHandler CanExecuteChanged;
            public void Execute(object parameter)
            {
                MessageBox.Show("Text Changed");
            }

            public bool CanExecute(object parameter)
            {
                return true;
            }
        }
    }
}

How EventBehaviourFactory works

EventBehaviourFactory uses the attached behaviour technique. Basically, it creates new Attached properties, one for each kind of event that you ask it to handle. The attached property lets you specify which command you want to be executed when the event is raised. The attached property is configured with a PropertyChanged handler (wrapped up in the private ExecuteCommandOnRoutedEventBehaviour class) that starts listening to the appropriate event on an object whenever the attached property is set on the object - and stops listening if the attached property is set to null.

As you read the code below, you might wonder why I have factored out the ExecuteCommandBehaviour class. That was because I was trying to include a way of handling non-routed events in this Factory as well. I ran into a couple of problems, however, so I took it. I'm not sure how useful it would have been anyway, because I couldn't find terribly many non-routed events in WPF. If this would be useful to anybody, let me know, and I'll have another stab at it.

The whole project is available on MSDN Code Gallery. There are a couple of example properties in there, and even a trio of unit tests. As a bonus, you get a Resharper template

using System;
using System.Windows;
using System.Windows.Input;

namespace FunctionalFun.Wpf
{
    public static class EventBehaviourFactory
    {
        public static DependencyProperty CreateCommandExecutionEventBehaviour(RoutedEvent routedEvent, string propertyName, Type ownerType)
        {
            DependencyProperty property = DependencyProperty.RegisterAttached(propertyName, typeof (ICommand), ownerType,
                                                               new PropertyMetadata(null, 
                                                                   new ExecuteCommandOnRoutedEventBehaviour(routedEvent).PropertyChangedHandler));

            return property;
        }

        /// <summary>
        /// An internal class to handle listening for an event and executing a command,
        /// when a Command is assigned to a particular DependencyProperty
        /// </summary>
        private class ExecuteCommandOnRoutedEventBehaviour : ExecuteCommandBehaviour
        {
            private readonly RoutedEvent _routedEvent;

            public ExecuteCommandOnRoutedEventBehaviour(RoutedEvent routedEvent)
            {
                _routedEvent = routedEvent;
            }

            /// <summary>
            /// Handles attaching or Detaching Event handlers when a Command is assigned or unassigned
            /// </summary>
            /// <param name="sender"></param>
            /// <param name="oldValue"></param>
            /// <param name="newValue"></param>
            protected override void AdjustEventHandlers(DependencyObject sender, object oldValue, object newValue)
            {
                UIElement element = sender as UIElement;
                if (element == null) { return; }

                if (oldValue != null)
                {
                    element.RemoveHandler(_routedEvent, new RoutedEventHandler(EventHandler));
                }

                if (newValue != null)
                {
                    element.AddHandler(_routedEvent, new RoutedEventHandler(EventHandler));
                }
            }

            protected void EventHandler(object sender, RoutedEventArgs e)
            {
                HandleEvent(sender, e);
            }
        }

        internal abstract class ExecuteCommandBehaviour
        {
            protected DependencyProperty _property;
            protected abstract void AdjustEventHandlers(DependencyObject sender, object oldValue, object newValue);

            protected void HandleEvent(object sender, EventArgs e)
            {
                DependencyObject dp = sender as DependencyObject;
                if (dp == null)
                {
                    return;
                }

                ICommand command = dp.GetValue(_property) as ICommand;

                if (command == null)
                {
                    return;
                }

                if (command.CanExecute(e))
                {
                    command.Execute(e);
                }
            }

            /// <summary>
            /// Listens for a change in the DependencyProperty that we are assigned to, and
            /// adjusts the EventHandlers accordingly
            /// </summary>
            /// <param name="sender"></param>
            /// <param name="e"></param>
            public void PropertyChangedHandler(DependencyObject sender, DependencyPropertyChangedEventArgs e)
            {
                // the first time the property changes,
                // make a note of which property we are supposed
                // to be watching
                if (_property == null)
                {
                    _property = e.Property;
                }

                object oldValue = e.OldValue;
                object newValue = e.NewValue;

                AdjustEventHandlers(sender, oldValue, newValue);
            }
        }
    } 
}

Monday 22 September 2008

Trying out Agile

As I mentioned a few weeks back, we've started work on a new product. So far, this has entailed much writing of Functional Specifications, many meetings, and very little gathering of momentum. Whilst on holiday back in August, doing my stint of baby-sitting duty outside my daughter's bedroom, giving my wife a break, I spent some time pondering on the best way to run the project, and how we could get things moving.

I'd taken along a couple of books (more on these below) about project management, and they each recommended Agile as a way of managing projects. The more I thought about Agile in the context of our project, the more I felt it was a good idea. Returning to work, it didn't take much to persuade my fellow developer, Roman that it would be nice to try it out. Our Project Manager came on board with the idea quite quickly, and now the Director sponsoring the project has given his blessing to adopting it.

For those of you who have never considered Agile before, I thought I'd jot down my thoughts about it, and point you in the direction of some reading material that I've found helpful. Any confirmed Agilists, or Anti-Agilists should feel free to chip in where I've got it right or wrong.

What is Agile?

Agile isn't one methodology: it's a whole family of them. Think of it as an old-fashioned Taylor's shop, where you can go to choose your cloth and colour, and have a methodology made to measure. Members of the family include DSDM, Crystal Clear, the better known Scrum, and the infamous (in some circles at least) EXtreme Programming (XP). They all vary in formality, terminology, documentality (I thought I'd been clever and coined a word, but it seems I wasn't the first), but at the heart of each is an emphasis on flexibility and feedback.

Flexibility is an attribute we all wish our work possessed at the end of a project when the client decides that what he's got isn't what he wants, even though it is exactly what he signed up to at the beginning. Unfortunately, by that late stage, it's usually too late to accommodate the kind of drastic changes that the client invariably has in mind. An Agile methodology side-steps that problem by delivering the work in increments, making sure that the customer gets the things that he values most early on in the project, and giving him opportunity to change his mind about what is important at each stage as he sees how things are going, and when new ideas strike him.

For many developers, Feedback is what they get at the end of a project in the form of a dressing-down from an irate executive who has just had to explain to a customer why they finally got the software six months late, and 100% over budget. The developer would no doubt like to feed back to the executive, that the reason for this is that she was asked to commit to a plan made before the requirements were even agreed or developers assigned to the project; to say nothing of the design, meticulously refined during the first few weeks of the project, that had to be thrown out when a key feature was added half-way through. Mention Agile to this kind of executive, and he'll snort, and dismiss it with the put-down that there wouldn't even be a plan if Agile had been followed. Which isn't true. Agileists might only spend a couple of hours scribbling estimates on post-it notes before they dive into coding; but they do that at regular intervals throughout the project when they know what progress they've made on implementing whole, working, tested features, so can anticipate with increasing confidence how much work remains to do.

Agile works very much on just-in-time, and just-enough principles. Requirements are gathered, often in the form of user stories, short descriptions, in the language of the user, describing something that the system needs to do. Enough of these are captured to define the first version of the system, and they include just enough detail for the group of developers on the project to give an order-of-magnitude estimate (often in Story Points) to each Story. At this stage attention turns to Iterations.

Iterations are the building blocks of Agile plans. Whatever you call them (Scrum calls them Sprints and others call them Time boxes), they are periods of time in which a new, potentially releasable, version of software is created. Customers priorities the stories, and pick out the ones they'd like for an iteration. Developers unpack each story to discover what tasks are involved, and how long each will take, in the process creating a detailed iteration plan. More discussion with the customer fleshes out each story, and provides a list of Acceptance tests that will indicate when the feature is done. The team get their heads together to design as much of the architecture as they need for that iteration; maybe the new designs will involve  refactoring code they have written before - but they always work with the safety net of fully automated unit tests to protect them. 

With each Story coded, tested and documented, the new version of the software is ready for demonstration to the customer. Seeing it might give him new ideas. But no matter; they just go on the list and get prioritised along with everything else. The Developers reflect on the iteration passed. They review their expectations about how many Iterations they expect the whole release to take, then round they go again on the next cycle1.

The first agile practices began back in the 1980s when developers and managers realised that for many software projects the Waterfall, plan-and-design-it-all-first, methodology wasn't working. Agile built up its fan base through the 1990s, with Kent Beck introducing Extreme Programming in 1996. In 2001 a group of Agile leaders got together and created the Agile Alliance and formalised the Agile Manifesto which states the principles that unite their different methodologies. Agile now has wide adoption, with big names like Cisco, Google, Microsoft and Yahoo all using it to a greater or lesser extent.

How can I find out more?

  • I first learnt about Agile in Alistair Cockburn's book, Crystal Clear. This describes the Crystal Clear Agile methodology which is perhaps the the one that refugees from Waterfall projects will feel most comfortable with, as it is more moderate than XP. Alistair leaves no area of the project lifecycle untouched, giving advice about how to carry out each part in an Agile manner. He has useful advice on the roles that different people in the project play, and what artifacts each should produce.
  • Johanna Rothman has written the excellent book Manage It! that covers a multitude of Project Management techniques, not just Agile one.  Reading her book, it seems to me that Agile emerges as her favourite way of running projects.
  • VersionOne, the developers of the agile planning tool that we're currently using (because they do a free version!), have put together a useful overview about Agile, Agile 101.
  • Gabrielle Benefield, formerly Director of Agile Development at Yahoo has co-authored a Scrum Primer
  • Last of all, I must mention Mike Cohn: I wish I'd discovered his work earlier. On his website, mountaingoatsoftware.com, he has a number of useful articles and presentation about how and why Agile works, and also his blog. I found his Introduction to Agile Estimating and Planning very helpful. I'm currently reading two of his books, User Stories Applied and and the more general Agile Estimating and Planning. Both of these books appear within the top 20 of a recent list of the Top 100 Software books, so I'm clearly not the only one who thinks these books are well worth your financial and cognitive investment. They'll be useful whatever flavour of Agile you might be considering. Each has an informative extended case study describing how Agile plays out in practice on a project.
Footnotes
  1. Agilists of other denominations might detect a bias towards XP and Scrum in my description: that's because proponents of these two methodologies seem to be most vocal on the web, and have contributed most to my stack of reading material.

Friday 19 September 2008

How to Label CruiseControl.Net Builds with Vault Folder Version Number

I've just accomplished a long-standing ambition. You'll laugh when I tell you what it is, and label me a geek; but I don't care: I'm a satisfied man. I've just figured out how to get the Build number of my software (you know - the fourth component that comes after Major.Minor.Revision) to tie up with the version number that our Source Control system assigns to the trunk folder of the project. Now, whenever I'm looking at a version of our software, I'll be able to tell exactly which version of the source code produced it.

We use CruiseControl.Net, running on an independent Build Server to rebuild the software every time we check something into the Source Control System, Sourcegear Vault (both excellent products by the way, highly recommended). CruiseControl is very configurable, and one of the things you can change is how it labels the builds it generates. For a while it has had the LastChangeLabeller which does almost what I want, but when used with Vault it generates labels based on the Transaction Id given to each check-in, not the Folder version number.

Earlier this year, Sourcegear produced their own CruiseControl plug-in, improving on the one that's included in CruiseControl. After Reflectoring through that, I at last figured out a way of implementing my own Labeller plug-in to do exactly what I want.

Follow in my Footsteps

  1. Download my ccnet.vaultlabeller.plugin.dll, and copy it to the CruiseControl.Net\server folder in Program Files
  2. Make sure you've configured CruiseControl to work with the the vaultplugin or fortressplugin: my labeller needs the extra information that they supply to do its stuff.
  3. Add this extra section to your project configuration in cruisecontrol (or use it to replace any current labeller block that you have). If you want a prefix included in the label, add it to the prefix element.

    <labeller type="vaultFolderVersionLabeller">
      <prefix></prefix>
    </labeller>

  4. Make sure your MSBuild or NAnt scripts are configured to get their Build number from the CCNetLabel or CCNetNumericLabel properties. For example, each of the projects in my solution is linked to a common file SharedAssemblyVersion.cs containing just the [AssemblyVersion] and [AssemblyFileVersion] attributes. Then my CruiseControl project is configured to run the following MsBuild target before doing the main build (note that it uses MsBuild Community tasks):

    <Project xmlns="http://schemas.microsoft.com/developer/msbuild/2003">
      <Import Project="MSBuild.Community.Tasks.Targets"/>
      
      <PropertyGroup>
        <BuildNumber>*</BuildNumber>
        <BuildNumber Condition="$(CCNetNumericLabel) != 0">$(CCNetNumericLabel)</BuildNumber>
      </PropertyGroup>
      
      <Target Name="UpdateSharedBuildNumber">
        <!-- Update the Build number of the assembly from that passed by CruiseControl-->
        <FileUpdate Condition=" $(BuildNumber) != '*'" ContinueOnError="true" Files="..\Shared\SharedAssemblyVersion.cs" Regex="(AssemblyVersion\(\&quot;\d+)\.(\d+)\.(\d+)\.\*" ReplacementText="$1.$2.$3.$(BuildNumber)" />
        <FileUpdate Condition=" $(BuildNumber) != '*'" ContinueOnError="true" Files="..\Shared\SharedAssemblyVersion.cs" Regex="(AssemblyFileVersion\(\&quot;\d+)\.(\d+)\.(\d+)\.." ReplacementText="$1.$2.$3.$(BuildNumber)" />
      </Target>
    </Project>

  5. Restart the CruiseControl.Net Service so that it picks up the changes, and you're done.

The Source Code

Creating a plug-in for CruiseControl.Net is easy. To a Visual Studio library project, add a reference to ThoughtWorks.CruiseControl.Core and NetReflector which you'll find in the the CruiseControl.Net\server folder. In this case I also needed to add a reference to the ccnet.fortressvault.plugin that SourceGear supplied. Then the plugin code is contained in one class:

using Exortech.NetReflector;
using ThoughtWorks.CruiseControl.Core;
using ThoughtWorks.CruiseControl.Core.Util;

namespace Paragon.CCNet.Label
{
    /// <summary>
    /// A CruiseControl Labeller that works in conjunction with the SourceGear Vault SourceControl plugin ("vaultplugin")
    /// Generates Labels based on the version number of the root folder.
    /// </summary>
    [ReflectorType("vaultFolderVersionLabeller")]
    public class VaultFolderVersionLabeller : ILabeller
    {
        public void Run(IIntegrationResult result)
        {
            result.Label = Generate(result);
        }

        public string Generate(IIntegrationResult integrationResult)
        {
           string label = integrationResult.LastIntegration.Label;

            if (integrationResult.HasModifications())
            {
                Modification[] modifications = integrationResult.Modifications;
                FortressModification modification = modifications[modifications.Length - 1] as FortressModification;

                if (modification != null)
                {
                    label = Prefix + modification.RootFolderVersion;
                }
                else
                {
                    Log.Warning("Vault modification info was not found: vaultFolderVersionLabeller should only be used with vaultplugin or fortressplugin");
                    label = Prefix;
                }
            }
            else
            {
                Log.Debug("No modifications found: reusing previous label.");
            }

            return label;
        }

        [ReflectorProperty("prefix", Required=false)]
        public string Prefix = string.Empty;
    }
}

A couple of Notes:

  • You need to decorate your plugin class with the ReflectorType attribute (see line 11): the value you give is the one that you'll use in the ccnet configuration file to specify which plugin to use
  • Any configuration properties of the class need to be decorated with the ReflectorProperty attribute (as in line 46).

Wednesday 17 September 2008

What's up with my Star Ratings?

A few months ago, I turned on Blogger's Star Ratings feature for my blog. I was hoping that it would be a quick way for people to give me feedback about my posts, without having to tax their brains too much by writing comments.

It doesn't appear to have been a great success: a three-toed sloth could count the number of ratings that most of my posts get, without even needing his other foot. But the thing I find most curious is that almost every post with ratings has been given one star, which on the Blogger scale corresponds to "Hated it". Are my posts really that bad?

Even my last post, which merely mentioned a utility that I found useful, was apparently an object of "hatred" for three people according to the rating they gave it. I mean, huh?

I've been trying to explain this strange behaviour to myself:

  1. Blogger star rating functionality is broken. This explanation would save my ego, but doesn't appear to be true. I can't find anybody else complaining in the Blogger forums
  2. The star rating widget is just too complicated for even my intelligent readers to use correctly
  3. My posts are so stunningly good that in fits of jealousy, readers mark me down.
  4. A concerned group of readers are making a concerted effort to teach me humility.
  5. My attempts at humour fall so consistently flat, my writing is so universally poor, and my content so boringly unoriginal that my posts deserve that one lone star.
  6. There are some people in the world who just like putting other people down.

Which is correct? Will somebody please tell me? Perhaps those people handing out the one-star awards would be kind enough to grant me a few words in a comment telling me how I can put my posts right?

Any way, I've decided to switch to a new rating widget from Outbrain. This one gives better reports about the most popular (or unpopular in my case) posts. I can also embed it in my feed (click the "Rate This" link in the "Feed Flare" at the bottom of the post), so that those of you who have obviously found enough merit in my written wafflings to subscribe can drown out the unreasonable votes with your own honest feedback.

Please!

Monday 15 September 2008

The easiest way to download source from Google Code

If ever you need to download code from Google Code - or any other web accessible Subversion repository, but don't want the hassle of installing a full SVN client (like TortoiseSVN), you might like to try DownloadSVN.

"A Simple stand-alone EXE utility" that does just what it says on the tin. You point it at the repository URL, give it a target folder on your computer, and it sucks the source down off the web. Just note that it requires .Net 2.0.

But perhaps you have an easier way? Do tell.

Friday 12 September 2008

Marketing Mashups

From  the SD Times today, in an article entitled "Business Mashup Suite seeks to aid agile developers":

September 10, 2008 — Serena has focused its efforts on mashups and agile offerings, and nearly one year after creating its Business Mashup suite, Serena made the mashup building box available on demand today, letting users build and deploy mashups without the need of an IP infrastructure.

Serena executives said this makes mashup deployment significantly simpler. The company has also created what it calls Rich Interface Mashups, which tie widgets, RSS feeds and Flash components into Serena mashups. As more tech-savvy workers enter the workplace, Serena said it has seen more work happening outside of traditional application development circles. Rich Interface Mashups let users coordinate activities like business meetings and development projects without having to write code, according to Serena.

Now I'm pretty keen on coding, but I'd never have thought of trying to schedule a meeting with my boss using C#, or even VBA (which he'd understand better!); Outlook usually does the trick for me.

I'm a dab-hand at TLAs and Internet jargon, but to me, this reads like high-tech marketing gobbledygook: what's an "IP infrastructure" got to do with mashups? I wonder what they really meant?

How to create a Gantt Control in WPF - Part 2

In the last episode we taught a still-fairly-young dog a new trick: under our tutelage, WPF learnt how to lay out controls using StartDate and EndDate properties to control their position. This is the first step on the road to creating a Gantt control. Along with flexible layout, ubiquitous data-binding is another of WPF's headline features (see also Josh Smith's introduction), and today I'll show how that relates to the the layout work we did last time.

As you would expect from a product styling itself a "Presentation Foundation", WPF makes it a breeze to present arbitrary collections of things in almost any way you want. The magic is performed by the ItemsControl, about which Dr WPF has composed a very useful A-Z guide. ItemsControl takes care of all the presentation work; sub-classes like ComboBox, ListBox and TreeView extend it with additional behaviour, like selection. In basic use though, you point an ItemsControl at a data source, and it enumerates the items and creates a visual representation for each of them using DataTemplates that you give it (DataTemplates, as you've guessed, use Data Binding to pick out useful bits of information from the data objects so that they can influence the display). In keeping with the layout flexibility of WPF, the ItemsControl doesn't care how items get laid out on screen: it delegates that responsibility to a Panel, and you get to choose which Panel it uses.

What this means for us is that we can take an collection of business objects representing tasks of some kind, each with a StartDate and an EndDate property, and, using an ItemsControl combined with the GanttRowPanel we created last time, lay them out on screen as a Gantt chart.

Let's work through this step by step.

Step by Step

First, a simple Task class with the vital Start and End properties:

namespace FunctionalFun.UI
{
    public class Task
    {
        public string Name { get; set; }
        public DateTime Start { get; set; }
        public DateTime End { get; set; }
    }
}

Next, a Window to host the example:

<Window x:Class="FunctionalFun.UI.ItemsControlExample"
    xmlns="http://schemas.microsoft.com/winfx/2006/xaml/presentation"
    xmlns:x="http://schemas.microsoft.com/winfx/2006/xaml"
    xmlns:gc="clr-namespace:FunctionalFun.UI"
    Title="Window1" Height="300" Width="600">
    <Border Width="Auto" Height="Auto" Margin="5,5,5,5" Padding="5,5,5,5" BorderBrush="#FF002BA1" BorderThickness="2,2,2,2" VerticalAlignment="Top">
		<Grid Width="Auto" Height="Auto">
			<Grid.Resources>
				<x:Array x:Key="Tasks" Type="{x:Type gc:Task}">
					<gc:Task Name="Wake Up" Start="06:45" End="07:10"/>
					<gc:Task Name="Eat Breakfast" Start="07:45" End="08:10"/>
					<gc:Task Name="Drive to Work" Start="08:10" End="08:30"/>
					<gc:Task Name="Check Blog Stats" Start="08:30" End="08:45"/>
					<gc:Task Name="Work" Start="08:45" End="12:00"/>
					<gc:Task Name="Write Blog" Start="12:00" End="13:00"/>
					<gc:Task Name="More Work" Start="13:00" End="17:45"/>
					<gc:Task Name="Sit in Traffic" Start="17:45" End="18:00"/>
				</x:Array>
			</Grid.Resources>
			<Grid.RowDefinitions>
				<RowDefinition Height="50"/>
				<RowDefinition Height="Auto"/>
			</Grid.RowDefinitions>
			<ItemsControl Grid.Row="0"  ItemsSource="{StaticResource Tasks}" Height="50">
				...
			</ItemsControl>
			<TextBlock Text="06:45" Grid.Row="1" HorizontalAlignment="Left" VerticalAlignment="Top"/>
			<TextBlock Text="18:00" Grid.Row="1" HorizontalAlignment="Right" VerticalAlignment="Top"/>
		</Grid>
	</Border>
</Window>

Inside the Resource dictionary of the Grid that is used for the overall Window layout, I've tucked an Array containing some instances of Tasks to act as a Data Source for my ItemsControl.

Now the ItemsControl needs to know how to present each of the items. Here's a DataTemplate that just draws a rectangle to represent the Task, with the Task's name displayed in a TextBlock and a ToolTip:

<ItemsControl Grid.Row="0"  ItemsSource="{StaticResource Tasks}" Height="50">
    <ItemsControl.ItemTemplate>
        <DataTemplate>
            <Border BorderBrush="#FF007F99" BorderThickness="1">
            	<Border.Background>
            		<LinearGradientBrush EndPoint="0.5,1" StartPoint="0.5,0">
            			<GradientStop Color="#FF2FD9FD" Offset="0"/>
            			<GradientStop Color="#FFCAF6FF" Offset="0.112"/>
            			<GradientStop Color="#FF47D8F7" Offset="1"/>
            		</LinearGradientBrush>
            	</Border.Background>
                <TextBlock Text="{Binding Name}" HorizontalAlignment="Center" VerticalAlignment="Center" ToolTip="{Binding Name}"/>
            </Border>
        </DataTemplate>
    </ItemsControl.ItemTemplate>
</ItemsControl>

You might wonder how the "Name" reference in the TextBlock Text property resolves to the Name property on the Task? That's because, when no other Data Source is explicitly given in a Binding expression for a property of an element, WPF uses whatever value has been assigned to the DataContext property of the element as the data source. The clever thing about the DataContext property is that (through the magic of Dependency Properties) it is able to inherit its value from DataContext property of the parent element in the control tree, if it hasn't had a value explicitly given. When ItemsControl creates a visual representation of an object using a DataTemplate, it sets the DataContext of the root visual element to point to that object, and thus all the children of the visual inherit that DataContext. Thus in this case, the DataContext property of, say, the TextBlock resolves to an instance of the Task class.

Finally, the interesting part, where we need to tell the ItemsControl how we want the items to be laid out. The first step is to tell it which kind of Panel to use. That's done by specifying a value for the ItemsPanel property. Specifically, we need to give it an ItemsPanelTemplate which is basically a factory that can create the kind of panel you want and set any properties that are needed - in this case the MinDate and MaxDate properties.

<ItemsControl Grid.Row="0"  ItemsSource="{StaticResource Tasks}" Height="50">
     <ItemsControl.ItemsPanel>
        <ItemsPanelTemplate>
           <gc:GanttRowPanel MinDate="06:45" MaxDate="18:00"/>
        </ItemsPanelTemplate>
      </ItemsControl.ItemsPanel>
</ItemsControl>

But that's not enough: we need to ensure that the visual elements that get created by the ItemsControl have on them the StartDate/EndDate properties they need to get laid out correctly. When I first tried this, I thought that the outermost element in the DataTemplate (Border in this case) would be the place for them, but that didn't work: the GanttRowPanel wasn't seeing the StartDate and EndDate properties. Having read the manual (aka MSDN) a little more carefully, I discovered that ItemsControl puts whatever elements the DataTemplate generates within a container, and it is the container that gets hosted by the Panel. If you want to set properties on this Container, then you need to use the ItemContainerStyle property of ItemsControl. Like this:

<ItemsControl Grid.Row="0"  ItemsSource="{StaticResource Tasks}" Height="50">
    <ItemsControl.ItemContainerStyle>
        <Style>
            <Setter Property="gc:GanttRowPanel.StartDate" Value="{Binding Start}"/>
            <Setter Property="gc:GanttRowPanel.EndDate" Value="{Binding End}"/>
        </Style>
    </ItemsControl.ItemContainerStyle>
</ItemsControl>

See how the Data Bindings here still resolve to properties on the data object? this is because it is actually the container element that gets its DataContext set to the data object.

And that completes the example. What? You want to see a picture? It's not terribly pretty at this point, but here you go:

Gantt Example Sams Day

If you’d like to try this out yourself, get the code on Github.

Tuesday 9 September 2008

How to create a Gantt Control in WPF

About two years ago I was in the fortunate position of having a client who was willing to pay to have Gantt charts added to his application, but no commercial Gantt chart available on the market. Thus I was paid to have fun over a couple of weeks creating one. It turns out to be quite straight-forward with WPF, and since at least one person has been drawn to my blog searching for "Gantt Chart WPF" (I mentioned it in an earlier post about What I do at work), I thought a few sporadic posts on how I did it might be of interest.

WPF Layout

We'll start at the bottom of the problem: how to layout individual bars of a Gantt within a row. WPF's layout functionality makes this part an almost-doddle.

When someone starts playing with WPF for the first time, they often start by creating a Window and putting controls on it. And then they hit the first incline of the learning curve: how do you set the position of controls in a Window? Windows Forms Controls have the Top property: where's the equivalent for WPF? Thus the newbie is introduced to the way layout works in WPF, and finds that it's all done by Panels.  Whenever you need to lay out a collection of visual elements, you put them inside a Panel. You pick your Panel according to the model that you want to use for layout: if you want to emulate the way Windows Forms works you use a Canvas and get absolute positioning; if you want to lay things out in rows and columns, use a Grid; want to put controls one on top of the other? then StackPanel is your friend.

That's why there are no positioning properties, no Left, Right, Top or Bottom on any of the WPF control classes: in most cases such properties are never needed. How then do controls say where they want to go in a panel like a Grid? That is all done by Attached Properties, which are defined by one class but have values set on objects of different classes. For example, Grid defines the Row and Column Attached Properties: these properties can be set on any WPF object, but only the Grid takes any notice of them. In this way each type of Panel can make available to the world the type of properties it needs to do its layout without the WPF base classes suffering API bloat.

Gantt charts are all about dates; specifically, start and end dates. When it comes to laying out Gantt bars it makes sense to do the layout in terms of dates, and this we can do thanks to the flexibility of the WPF layout system. The goal is to arrive at the point where we can use StartDate and EndDate properties to position elements in a panel in the same way that Row and Column properties are used to position elements in a Grid.

Gantt Layout

Let's dive straight into some code:

using System;
using System.Windows;
using System.Windows.Controls;

namespace FunctionalFun.UI
{
    public class GanttRowPanel : Panel 
    {
        public static readonly DependencyProperty StartDateProperty =
           DependencyProperty.RegisterAttached("StartDate", typeof(DateTime), typeof(GanttRowPanel), new FrameworkPropertyMetadata(DateTime.MinValue, FrameworkPropertyMetadataOptions.AffectsParentArrange));
        public static readonly DependencyProperty EndDateProperty =
            DependencyProperty.RegisterAttached("EndDate", typeof(DateTime), typeof(GanttRowPanel), new FrameworkPropertyMetadata(DateTime.MaxValue, FrameworkPropertyMetadataOptions.AffectsParentArrange));

        public static readonly DependencyProperty MaxDateProperty =
           DependencyProperty.Register("MaxDate", typeof(DateTime), typeof(GanttRowPanel), new FrameworkPropertyMetadata(DateTime.MaxValue, FrameworkPropertyMetadataOptions.AffectsMeasure));
        public static readonly DependencyProperty MinDateProperty =
            DependencyProperty.Register("MinDate", typeof(DateTime), typeof(GanttRowPanel), new FrameworkPropertyMetadata(DateTime.MaxValue, FrameworkPropertyMetadataOptions.AffectsMeasure));


        public static DateTime GetStartDate(DependencyObject obj)
        {
            return (DateTime)obj.GetValue(StartDateProperty);
        }

        public static void SetStartDate(DependencyObject obj, DateTime value)
        {
            obj.SetValue(StartDateProperty, value);
        }

        public static DateTime GetEndDate(DependencyObject obj)
        {
            return (DateTime)obj.GetValue(EndDateProperty);
        }

        public static void SetEndDate(DependencyObject obj, DateTime value)
        {
            obj.SetValue(EndDateProperty, value);
        }

        public DateTime MaxDate
        {
            get { return (DateTime)GetValue(MaxDateProperty); }
            set { SetValue(MaxDateProperty, value); }
        }

        public DateTime MinDate
        {
            get { return (DateTime)GetValue(MinDateProperty); }
            set { SetValue(MinDateProperty, value); }
        }

        protected override Size MeasureOverride(Size availableSize)
        {
            foreach (UIElement child in Children)
            {
                child.Measure(availableSize);
            }

            return new Size(0,0);
        }

        protected override Size ArrangeOverride(Size finalSize)
        {
            double range = (MaxDate - MinDate).Ticks;
            double pixelsPerTick = finalSize.Width/range;

            foreach (UIElement child in Children)
            {
                ArrangeChild(child, MinDate, pixelsPerTick, finalSize.Height);
            }

            return finalSize;
        }

        private void ArrangeChild(UIElement child, DateTime minDate, double pixelsPerTick, double elementHeight)
        {
            DateTime childStartDate = GetStartDate(child);
            DateTime childEndDate = GetEndDate(child);
            TimeSpan childDuration = childEndDate - childStartDate;

            double offset = (childStartDate - minDate).Ticks * pixelsPerTick;
            double width = childDuration.Ticks * pixelsPerTick;

            child.Arrange(new Rect(offset, 0, width, elementHeight));
        }
    }
}

As you can see in lines 9-12, GanttRowPanel registers two Attached Properties (StartDate and EndDate) that it will look for on child elements when deciding how to lay them out. It also defines (lines 4-17) two straight-forward Dependency Properties (MaxDate and MinDate) which are used to determine the range of dates that the Panel should expect to display. Lines 20 to 50 contain the obligatory getters and setters for each of these properties.

Notice in particular that when I register the MaxDate and MinDate properties I set the FrameworkPropertyMetadataOptions.AffectsMeasure flag. This does something clever: it tells WPF that when either of these properties changes, the  layout of Panel will become invalid, so will WPF please be kind enough to layout the panel again. Something even cleverer happens for the StartDate and EndDate attached properties when I set the FrameworkPropertyMetadataOptions.AffectsParentArrange flag. This asks WPF that, if either of these properties get changed on a UI element, it should find the parent of that element (in this case the GanttRowPanel) and rearrange the elements within it. Oh the wonder of the Dependency Property subsystem!

As Dr WPF explains, to get a Panel to do its stuff, you need to override two virtual methods, MeasureOverride  and ArrangeOverride. These are the points at which your panel hooks into the WPF layout system. There's one method for each of the two passes of the layout system: the Measure pass determines how much space each element in the display would like to use; the Arrange pass tells each element how much space it has been given, and asks it to fall into line.

The MeasureOverride method starting at line 52 is very simple. It first asks each of the child controls to measure themselves -  every Panel must do this for its children, even if, as in this case, the parent is eventually going to impose a size on its children. Then it just returns a size of (0,0) to indicate to the layout system that it'll take all the space it's given.

The ArrangeOverride method is slightly more involved, because we finally need to take the plunge and convert dates into pixels. At this point in the proceedings the Panel has been given its slot on screen and it's passed a finalSize indicating how big that slot is. It's now up to GanttRowPanel to lay out its children as it sees fit. Note that layout within a panel is all done relative to the top-left corner of panel: that is why ArrangeOverride is only supplied with a size and not a position

The first thing our override does is to calculate what range of dates it is expected to display (using its MinDate and MaxDate properties) and from that derive how many pixels are to be used for displaying each Tick (a Tick being the smallest unit in which DateTimes are measured). That calculated, we can then lay out each child. We convert its start date and duration into an offset and width by multiplying by the pixels-per-tick value. Having assumed that the child element will have the same height as the panel, this gives us a bounding box for the child element which we pass to the child's Arrange method - when interpreting this bounding box (passed as a Rect) remember that the Arrange method on a child works relative to the top left position of its parent (the GanttRowPanel in this case).

And so we've taught the WPF layout system to lay things out by date. Here's a very simple example of using the GanttRowPanel:

<Window x:Class="FunctionalFun.UI.GanttRowPanelExample"
    xmlns="http://schemas.microsoft.com/winfx/2006/xaml/presentation"
    xmlns:x="http://schemas.microsoft.com/winfx/2006/xaml"
    xmlns:UI="clr-namespace:FunctionalFun.UI"
    Title="GanttRowPanelExample" Height="300" Width="300">
    <UI:GanttRowPanel MinDate="09:00" MaxDate="17:00">
        <TextBlock Text="Work" UI:GanttRowPanel.StartDate="09:00" UI:GanttRowPanel.EndDate="12:00"/>
        <TextBlock Text="Lunch" UI:GanttRowPanel.StartDate="12:00" UI:GanttRowPanel.EndDate="13:00"/>
        <TextBlock Text="Work" UI:GanttRowPanel.StartDate="13:00" UI:GanttRowPanel.EndDate="17:00"/>
    </UI:GanttRowPanel>
</Window>

Coming up

In my next post I'll give an example illustrating how you can use this Panel in an ItemsControl to layout things from any old data source.

Looking further ahead, I might show how to build upon this panel to create a multi-row Gantt control with independent headers and interactive bars. It all depends on how much love you show me!

Friday 5 September 2008

Project Euler Problem 19: A Century of Sundays

There's a hard way and an easy way to solve Problem 19 in our ongoing struggle with Project Euler, where we're asked to count how many Sundays fell on the first of the month during the twentieth century - being software developers and thus virtuously lazy by nature we wouldn't consider the tedious way, getting out all those old diaries (wherein entries invariably finish around January 5th) and actually counting whilst flicking over the pages.

The hard way is to use the information given in the problem definition and devise an algorithm for calculating days of the week that each date falls on. The easy way uses with gratitude the brainpower the .Net Framework developers invested in their work. It's Friday: I'll take the easy way.

Thanks to C#3.0 and LINQ, the actual code to the solution is a one-expressioner:

[EulerProblem(19, Title = "How many Sundays fell on the first of the month during the twentieth century?")]
public class Problem19
{
    public long Solve()
    {
        DateTime endDate = new DateTime(2000, 12, 31);
        DateTime startDate = new DateTime(1901, 1, 1);

        return startDate
            .Unfold(date => date.AddMonths(1))
            .TakeWhile(date => date <= endDate)
            .Count(date => date.DayOfWeek == DayOfWeek.Sunday);
    }
}

If it's Friday for you as well then I'll let you read the following explanatory notes: otherwise, work it out for yourself!

Remember my Unfold extension method? The one that takes a seed value (startDate in this case) and generates a sequence by repeatedly applying an expression to previous value in the sequence to create the next. That combined with the TakeWhile method represent the functional-programming equivalent of the for loop. The Count overload that I'm using here counts every item in a sequence matching a particular criterion. So the code I have above is equivalent to this:

DateTime endDate = new DateTime(2000, 12, 31);
DateTime startDate = new DateTime(1901, 1, 1);

int count = 0;
for (DateTime date = startDate; date < endDate; date = date.AddMonths(1))
{
    if (date.DayOfWeek == DayOfWeek.Sunday)
    {
        count++;
    } 
}

return count;

Monday 1 September 2008

Are your projects like this?

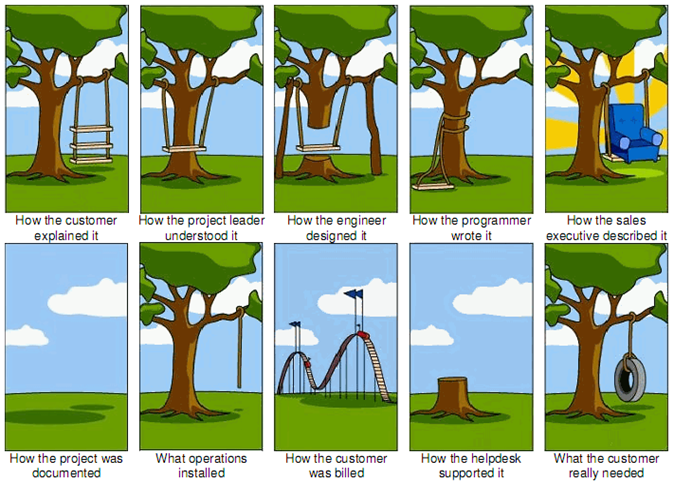
One of my regular readers emailed me a geeky cartoon which I'd not seen before (thanks Karl!). You're very lucky if you've never worked on a project like this:

The Tree Swing Project Management Cartoon

I googled around to find the original source of this cartoon, but drew a blank. My searching did, however, uncover an article by Alan Chapman who has looked into the history of the Tree Swing drawings and found that it goes back aways - at least to the 1960s, and possibly earlier. He cites several appearances during the last forty or so years from many different constituencies in the working world, including an early version that apparently circulated through the British Civil Service in their internal newspaper (aptly named "Red Tape"). It seems the developers are not alone in feeling the frustration expressed in these pictures.

A micro-industry has grown around these cartoons. There's now a website devoted to them: The Project Cartoon.com (a Web 2.0 site, trendily in beta). You can buy the cartoon on posters or T-Shirts, or even create a customised version with your own captions, in myriad languages.

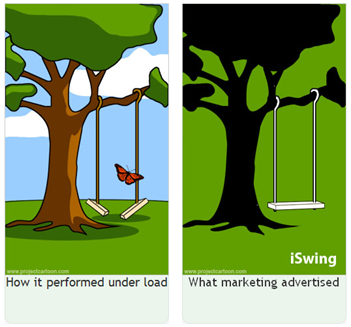
Here are my favourite additions:

AdditionalTreeSwingPanels